
It should go without saying that keeping your lipo packs balanced is one of the best things you can do to maximize the life of your expensive batteries.
Balancing probably ranks just behind two “don’ts”, namely don’t over charge or over discharge you lipos. In a nutshell, balancing allows you to keep each of the cells in your multi-cell battery pack at the same voltage. That way, when either charging or discharging the battery you’re likely to reach the cutoff voltage without one cell or another being too high or too low.
Enter the Blinky.
As I started to collect more lipo batteries, the need for a balancer that could deal with different cell counts and brands became apparent. The Blinky allows me to balance batteries while charging, after charging, and to discharge overcharged battery cells. To operate the Blinky, simply plug it in. I’ll talk a little about that in a minute.
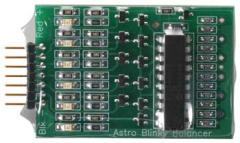
On first glance, I viewed the Blinky with some suspicion. It is really nothing more than a circuit board wrapped in some clear heat shrink. It seemed a little fragile and plain. I think I was expecting something with a case and wires and the like. However, a couple of good reviews and reasonable price won me over. While it is plain, I haven’t found it to be fragile. The pins are sturdy and it will stand up to reasonable handling. That being said, I don’t let it loose in my tool box. An old plastic receiver case makes a nice protective home for Blinky when not in use.
As I mentioned, there is really nothing to using the Blinky. (My kind of tool) When plugged into the balancing socket of the battery, it measures the voltage of all cells. The LEDs for the cells above 3.2 volts will illuminate. Cells below that voltage will not. The instructions describe how to slowly increase low-cell voltage without damaging the battery or having other bad lipo things happen.
Balancing occurs without operator intervention either while charging or afterwards. The Blinky senses the voltage of the cells and works to equalize them. While charging, balancing begins when the highest cell reaches 3.9 volts. After charging, the lowest voltage cell becomes the target voltage. The Blinky gets its name from the flashing LEDs that indicate that a cell is being discharged. The Blinky reads voltage every two seconds and the LED flashes if discharging occurs. When the pack is balanced, the flashing stops or at least occurs very intermittently.
The instructions that come with the Blinky describe the required pin alignments. Diagrams clearly mark the pin placements. Basically, your battery balancing socket needs to be wired with increasing voltage on the black or negative leads without gaps and the red lead at the end. For example, on a three cell pack, the first black wire would be negative, the second wire 4 volts, the third wire 8 volts and the last wire (red) would be 12 volts. I needed to close a gap on the pin placements on the sockets with the batteries I had. It was a simple matter of using a straight pin to release the spring clip holding the wire in the socket and then re-inserting it into the empty hole closer to the other leads. Don’t worry, the instructions also show what changes need to be made to the connection configurations you are likely to run across. Blinky will accept up to six cell batteries. An addition to the Blinky is an adaptor for Thunderpower batteries. This small circuit board simple changes the spacing so the tighter balance plugs on TP batteries will work with the Blinky. It's cheap--about $5.00.
You get to decide how often you balance your packs. I usually put mine through the Blinky routine every two or three charges. You can get more info on the Blinky at www.astroflight.com.
It isn’t sexy but it does the job with a reasonable price tag.


