The F-22 from internet plans from user tomhe on the E-Zone was my second depron scratch-built project. I learned a couple of lessons from the Fan Trainer also reviewed on this site. The big lesson was using low tack spray adhesive by Krylon to attach the paper pattern pieces on the foam.
The second big lesson was the need to stay aware of the knife angle while cutting the foam. For the pieces to fit together well, a nice clean 90 degree cut is very helpful.
With those lessons in mind, I got going on the F-22. As with the Fan Trainer, I downloaded the tiled version of the plans from E-Zone. You can often find full plans in PDF format that you can bring to a Kinko’s for printing on a large single sheet. Since you end up cutting the pattern pieces out anyway, running pages through the home printer is quicker and cheaper. In the case of the F-22 the plans come on 18 pages that are marked with row and column codes and alignment marks. Taping the plans together is a snap.
The depron I had came in 13X28 inch sheets. The F-22 wing and fuselage piece is bigger than that so I played around a little to determine the best place to cut. I ended up making an angled cut forming a bowl shape (\_/ )to avoid a straight cut and spread out any stress on the joint. I then fit the other pieces into the foam sheets minimizing the sheets used. There are few pieces to the F-22 so the cutting was done in about 20 minutes.
After dry fitting the pieces together I used Ultimate RC Foam Glue for most of the assembly. Speaking of assembly, I used the assembly guide found at www.6mmflyrc.com. The only deviation I made was using the wing spar mounting technique described in the reference section at www.rcpowers.com. Instead of cutting all the way through the wing and filling the gap with the spar and epoxy, I marked a hobby knife for a 3mm depth and cut the outline for the spare and used a small screwdriver to “dig out” the foam forming a channel for the spar. I used epoxy to glue it in place.
Many of the pieces are angled into the main body and wing planform. I tried a couple of techniques to get the angles in the mounting holes. First I tried using some small pieces of fairly course sandpaper to form the angles. Ultimately I became impatient and moved on to a sharp hobby knife. That went much faster and I used sandpaper for fine adjustments. After getting a sense for the angles of the vertical stabilizers, I reverted to the sandpaper to bevel the lower edge. I chose to use Gorilla Glue to attach them. Polyurethane glue expands a little as it sets to it filled the joints nicely, even where the angles weren’t perfect.
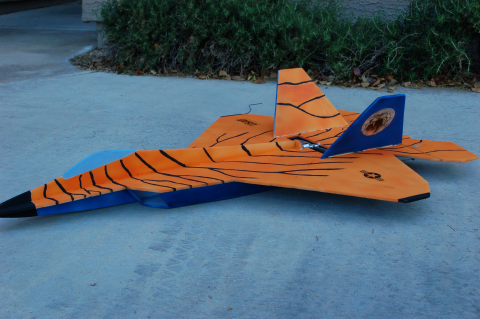
The F-22 has a large equipment area. I mounted two strips of Velcro along the top of the bay and attached the ESC and receiver. I used industrial strength Velcro and ran it up nearly to the opening. This allows for battery mounting as well. I’ve done some pretty aggressive maneuvers and had still had to pry the battery off the Velcro after flight. The servos mount in the sidewall of the bay near the wing spar. I used HS 55 servos. Most pilots reported good performance with only the elevons with their tabs that extend into the prop blast adding more control effectiveness. That is what I did. The power system is a BP Hobbies 2212 6 turn motor with a 30 amp ESC. I use a 1550 mAh 3-cell lipo for power. This set-up pulls 18.4 amps and produces 175 watts spinning an APC 6X4 propeller.
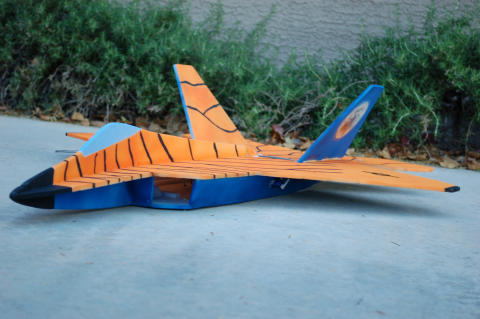
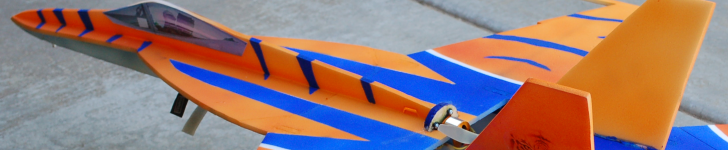
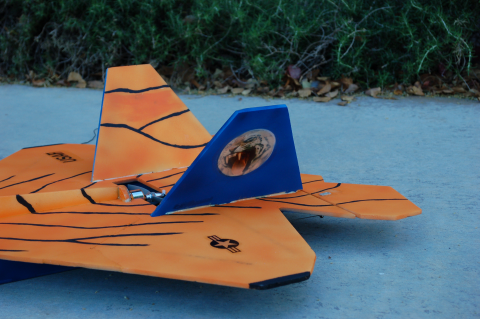
I finished the F-22 with a Tiger paint scheme. There have been a number of model EDF jets with this theme on the market. For the F-22 I looked at some of the models and also some of the pictures on Google Images. I chose to go with an orange top and a dark or true blue bottom. I decided to put a tiger on the tail, too.
As I normally do, I used craft-type acrylic paint from Michaels. The small bottles come in a wide array of colors for about a buck. I use a double action airbrush powered by a 2-gallon compressor. I usually end up thinning the paint at about 50 - 50 to 40 – 60 using windshield washer fluid. The fluid seems to lower the surface tension of the paint allowing a smooth coat to be applied with multiple light applications. The stripes were brushed on.
I explored images online and found a tiger face I liked. I cut out a circle from the image using Paint.net imaging editing software that is available free online. After sizing the image I printed a paper copy and test fit it to the vertical stabilizers. Using the paper copies for a mask, I painted the outside of the vertical stabs blue. I used Testor’s Inkjet decal paper and printed out the tiger faces on clear decal paper. After spraying them with the fixing spray and letting them dry I applied them onto the white circles left from the masks resulting the white foam showing through giving the tiger its orange, black and white colors.
The maiden flight went smoothly although I was disappointed in the roll rate. An aileron roll was so slow that I lost a lot of pitch and altitude. It didn’t seem to matter what speed I was going. I just rolled maddeningly slow. The build thread on E-Zone had comments about linking the elevons to additional control surfaces cut in the wings where ailerons would go. To keep the weight down, the same servos programmed for the elevons moved these surfaces too. While I considered that I spend a little time testing the control surfaces. Everything seemed to move to full deflection and nothing seemed to bind.
After another flight with poor roll performance it dawned on me that in my static tests I wasn’t simulating air pressure on the control surfaces. With just a little resistance on the elevons the issue became clear. The control rods were bowing. I had used thin music wire and the long run allowed for much of the servo energy to end up bending the wire instead of moving the elevons. I considered putting the wire in a small carbon fiber tube to add stiffness, but ended up trying simple stand-off brackets to give support along the length of the run. With two brackets on each side, the wire didn’t have enough room to flex. The following flight was much better. The roll rate was brisk and the model rolled nicely around the longitudinal axis. Problem solved.

![]()