Building a model from scratch has been a interest of mine for a while. I didn’t really see myself as a balsa modeler so I was interested in the models being built and discussed in the scratch-built foamy section of the E-Zone.
Within that section are literally dozens of ideas and free plans for planes both modeling full scale aircraft and ones from folk’s imaginations.
The one that caught my eye was a somewhat dated thread of an EDF depron model with a box fuselage and straight wings. This filled the need of both building a scratch built model and trying out an EDF at the same time. What’s not to like.
I downloaded the plans from the thread and printed them out on my inkjet printer. In reading through the various threads I found that most builders post plans in tiled PDF formats as well as the full size plan. Full size plans can be saved to a thumb drive and taken to a copy shop like Kinko’s and printed using their large printers. I checked with one shop and they said it would cost about $10. Being a frugal modeler, I chose to run the 15 pages of paper through my printer and spend some time taping the pages together. The pages are numbered with row and column positions and have alignment marks that make assembly very easy. I also took a look at some assembly videos on sites like RC Powers to get a feel for working with the foam.
I ordered a small case of depron foam from one of the providers that advertise on E-Zone. I got 10 sheets of 29 by 17 inch sheets. I’ve since discovered that these are actually half sheets so larger sheets are available. While I waited for the foam to arrive I spent time reading through the threads and downloading plans for follow-on projects.
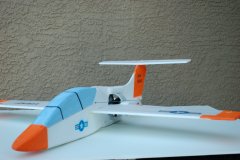
I chose the Fan Trainer because it’s a simple build. It was my foam training ground. After cutting out the patterns for the pieces I played with their placement on the foam to minimize wasted foam. I ended up using two of the sheets. I took some advice I had gathered online and pinned the patterns to the foam to hold them in one place. That worked OK but I still had some movement which resulted in some sanding to get pieces to fit. I found some Krylon low tack adhesive in a craft store and have since used it very effectively to hold paper patterns down. No more pins. Just spray a light coat on the paper and let it dry. You can then lay it on the foam and it will bond nicely while remaining easy to peel up.
Once the pieces were cut out I lightly sanded the edges. As assembly progressed I discovered that taking one’s time while cutting is very important. You want to make sure you don’t induce an angle to the cut. The good thing about foam is that with a little sanding things will fit and that since the foam is cheap a “re-do” is also easy.
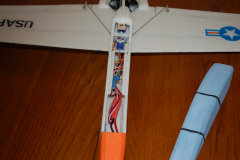
The fuselage is basically a foam box. I used doublers along the joints to give more strength and glue surface. It also allowed for sanding a curved edge while maintaining strength. Since both ends of the fuselage taper in, I needed to bend the foam. Two lessons here. One, use a hairdryer or heat gun to soften the foam to help make the bends. Two, work both sides together and then glue when you’re happy with the fit. I formed one side to match the curve of the top and bottom and then worked the second side after the first had dried. I ended up getting a bit of a warp as the glue dried on the first side. As a result the second side didn’t fit as well and the fuselage was twisted. At this point I referred back to lesson one and used the heat gun to warm things up and apply some pressure to eliminate the warp. It worked but working both sides together would have likely avoided the aggravation.
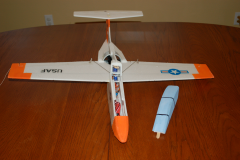
I used a Popsicle stick to latch down the front of the canopy and a magnet for the rear. While this ultimately worked, it needed a little refinement. On the first flight the canopy flew off. Clearly the magnet wasn’t strong enough. There was also some “give” in the fuselage sides resulting in a loose canopy fit. The fix included a more powerful magnet to hold tighter, and guide rails along the fuselage side extending up into the canopy when properly mounted. I also fit small pieces of foam to make the slot for the front stick snug. No more lost canopies.
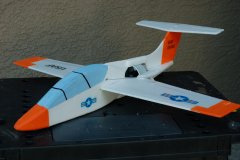
My initial attempt at the EDF selection proved wanting. The set-up I tried first included an inrunner motor I had on hand in a 70mm EDF unit. This proved simply too heavy for the small plane. On the first launch it simply settled gently onto the ground at full power. I ordered an inexpensive 64mm EDF combo from Hobby King. The housing was smaller and lighter. The motor was an out runner and again, much lighter. After a little surgery on the plane, the old fan was out and the new fan was in. I added extra foam around the fan unit to both make a tighter fit since the old fan was larger and to add strength to the fuselage. Together with a smaller battery I shaved almost 8 ounces off the gross weight – almost 33%.
It took a couple of flights and some work on the high-mounted horizontal stabilizer to get the model trimmed. The first flights I ended up holding a lot of nose down elevator even after applying all available trim with the transmitter. After making an adjustment to the elevator, it became clear the stabilizer was the culprit. I cut it off and added a little nose down angle. After the adjustment I was able to get the trim much closer, although it still wants to climb a little.
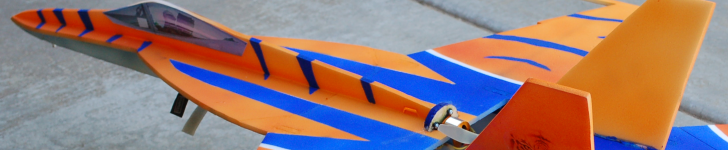
The little jet is a treat to fly and is a great first foam and first EDF project. It looks great in the air and the howl of the EDF will turn heads at the field. The relatively small control surfaces will mean you won’t be doing any snappy aerobatics but I’ve been able to coax some slow aileron rolls and loops out of it. I’ve used both two-cell and three-cell lipo batteries with the fan trainer. The two-cell batteries generate about 105 watts of power with the little fan and the model flies well, although an over-the-top maneuver requires exchanging altitude for airspeed to have the energy to complete the loop. With the three-cell, I measured about 300 watts and the model will go noticeably faster. I still needed a little dive to complete a loop, however.
The little EDF will slow down in a hurry. Reducing the power will result in a fairly steep dive to maintain airspeed. The landings are easy but you need to remember to fly it down to the runway bringing the power to idle just as it touches down. I glued a Popsicle stick to the bottom as a skid. It works well.

![]()